震撼不亚于ChatGPT的抠图神器 |
您所在的位置:网站首页 › python 抠图 › 震撼不亚于ChatGPT的抠图神器 |
震撼不亚于ChatGPT的抠图神器
|
项目地址:https://github.com/facebookresearch/segment-anything1 部分图片效果 废话少说,先来一点小小的震撼 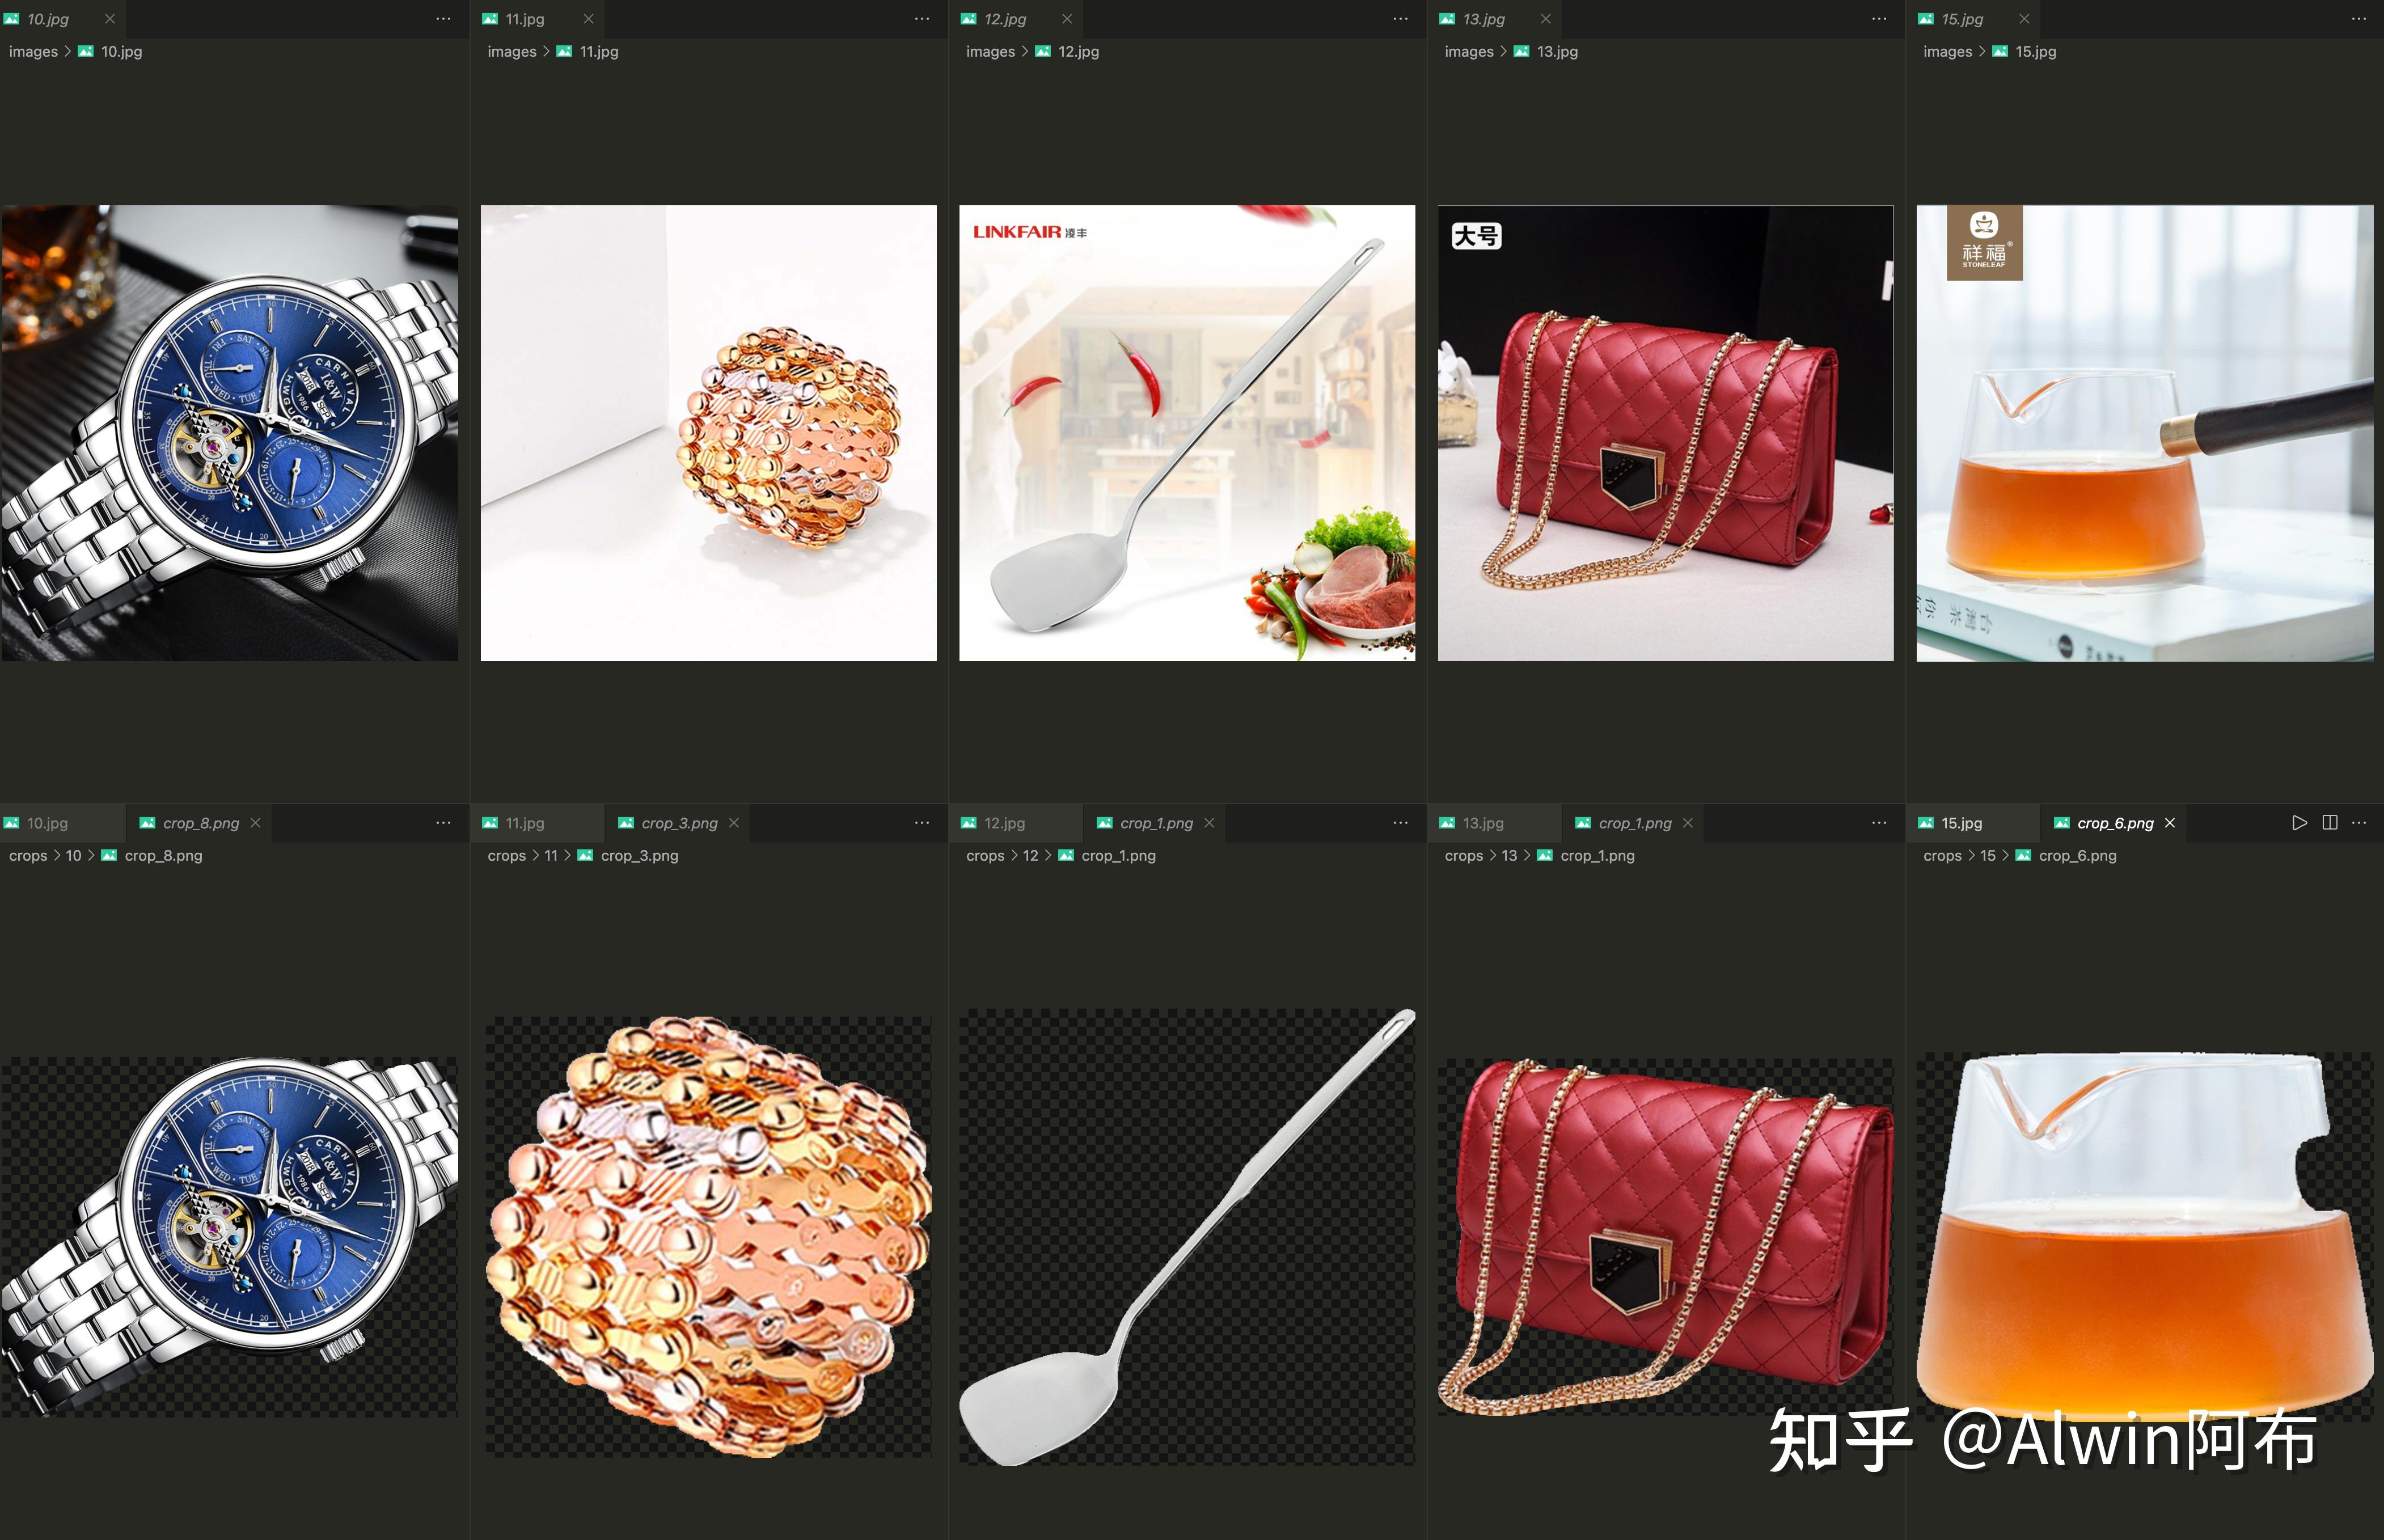 图1 部分图片抠图 图1 部分图片抠图 图2 部分图片抠图 图2 部分图片抠图环境配置: (1)安装 直接安装: pip install git+https://github.com/facebookresearch/segment-anything.git 或者git项目后再安装 git clone [email protected]:facebookresearch/segment-anything.git cd segment-anything; pip install -e . pip install opencv-python pycocotools matplotlib onnxruntime onnx(2)模型文件下载 default or vit_h: ViT-H SAM model.vit_l: ViT-L SAM model.vit_b: ViT-B SAM model.2.Starting 图3 tutorial入口 图3 tutorial入口使用项目中notebooks里面的实例,就可以直接开始识别 2.1 自动全部分割主要代码 import numpy as np import torch import matplotlib.pyplot as plt import cv2 from segment_anything import sam_model_registry, SamAutomaticMaskGenerator, SamPredictor image = cv2.imread('images/dog.jpg') image = cv2.cvtColor(image, cv2.COLOR_BGR2RGB) sam_checkpoint = "sam_vit_h_4b8939.pth" model_type = "vit_h" device = "cuda" sam = sam_model_registry[model_type](checkpoint=sam_checkpoint) sam.to(device=device) mask_generator = SamAutomaticMaskGenerator(sam) masks = mask_generator.generate(image)Mask generation returns a list over masks, where each mask is a dictionary containing various data about the mask. These keys are: segmentation : the maskarea : the area of the mask in pixelsbbox : the boundary box of the mask in XYWH formatpredicted_iou : the model's own prediction for the quality of the maskpoint_coords : the sampled input point that generated this maskstability_score : an additional measure of mask qualitycrop_box : the crop of the image used to generate this mask in XYWH format2.2 保存切割出来的segment图片import numpy as np from PIL import Image, ImageDraw, ImageFont def segment_image(image, segmentation_mask): image_array = np.array(image) segmented_image_array = np.zeros_like(image_array) segmented_image_array[segmentation_mask] = image_array[segmentation_mask] segmented_image = Image.fromarray(segmented_image_array) black_image = Image.new("RGBA", image.size, (0, 0, 0,0)) transparency_mask = np.zeros_like(segmentation_mask, dtype=np.uint8) transparency_mask[segmentation_mask] = 255 transparency_mask_image = Image.fromarray(transparency_mask, mode='L') black_image.paste(segmented_image, mask=transparency_mask_image) return black_image def convert_box_xywh_to_xyxy(box): x1 = box[0] y1 = box[1] x2 = box[0] + box[2] y2 = box[1] + box[3] return [x1, y1, x2, y2] import os cropped_boxes = [] image_path = "images/3.jpg" save_path = "crops/3" if not os.path.exists(save_path): os.mkdir(save_path) image = Image.open(image_path) for i, mask in enumerate(masks): sub_img = segment_image(image, mask["segmentation"]) # cropped_boxes.append(sub_img) sub_img.save(f'{save_path}/crop_{i}.png')2.3 给SAM Prompts提示后,指定区域seg2.3.1 加载模型from segment_anything import sam_model_registry, SamPredictor sam_checkpoint = "sam_vit_h_4b8939.pth" model_type = "vit_h" device = "cuda" sam = sam_model_registry[model_type](checkpoint=sam_checkpoint) sam.to(device=device) predictor = SamPredictor(sam) predictor.set_image(image)2.3.2 给一个点作为prompt(提示)前景点或者背景点 input_point = np.array([[500, 375]]) input_label = np.array([1]) masks, scores, logits = predictor.predict( point_coords=input_point, point_labels=input_label, multimask_output=True, # 在prompt不明确时建议打开multimask ) for i, (mask, score) in enumerate(zip(masks, scores)): plt.figure(figsize=(10,10)) plt.imshow(image) show_mask(mask, plt.gca()) show_points(input_point, input_label, plt.gca()) plt.title(f"Mask {i+1}, Score: {score:.3f}", fontsize=18) plt.axis('off') plt.show()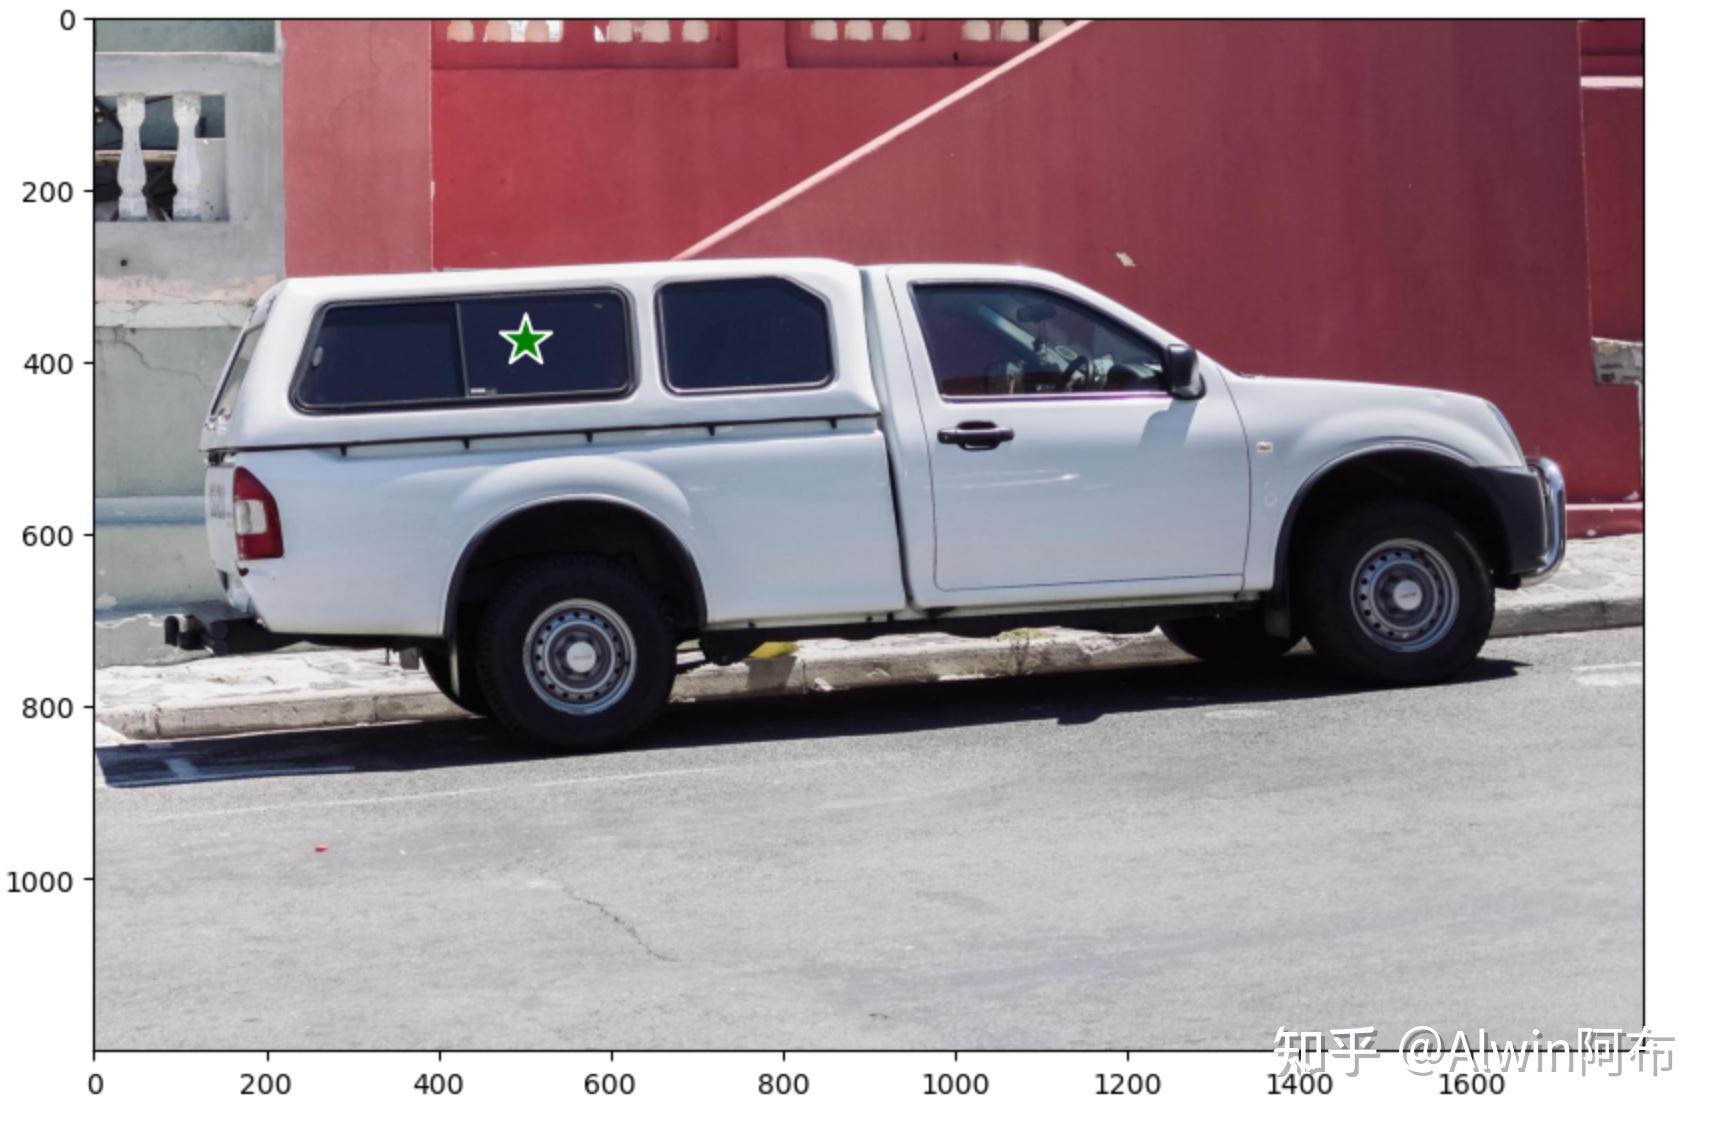 图4 选择的点 图4 选择的点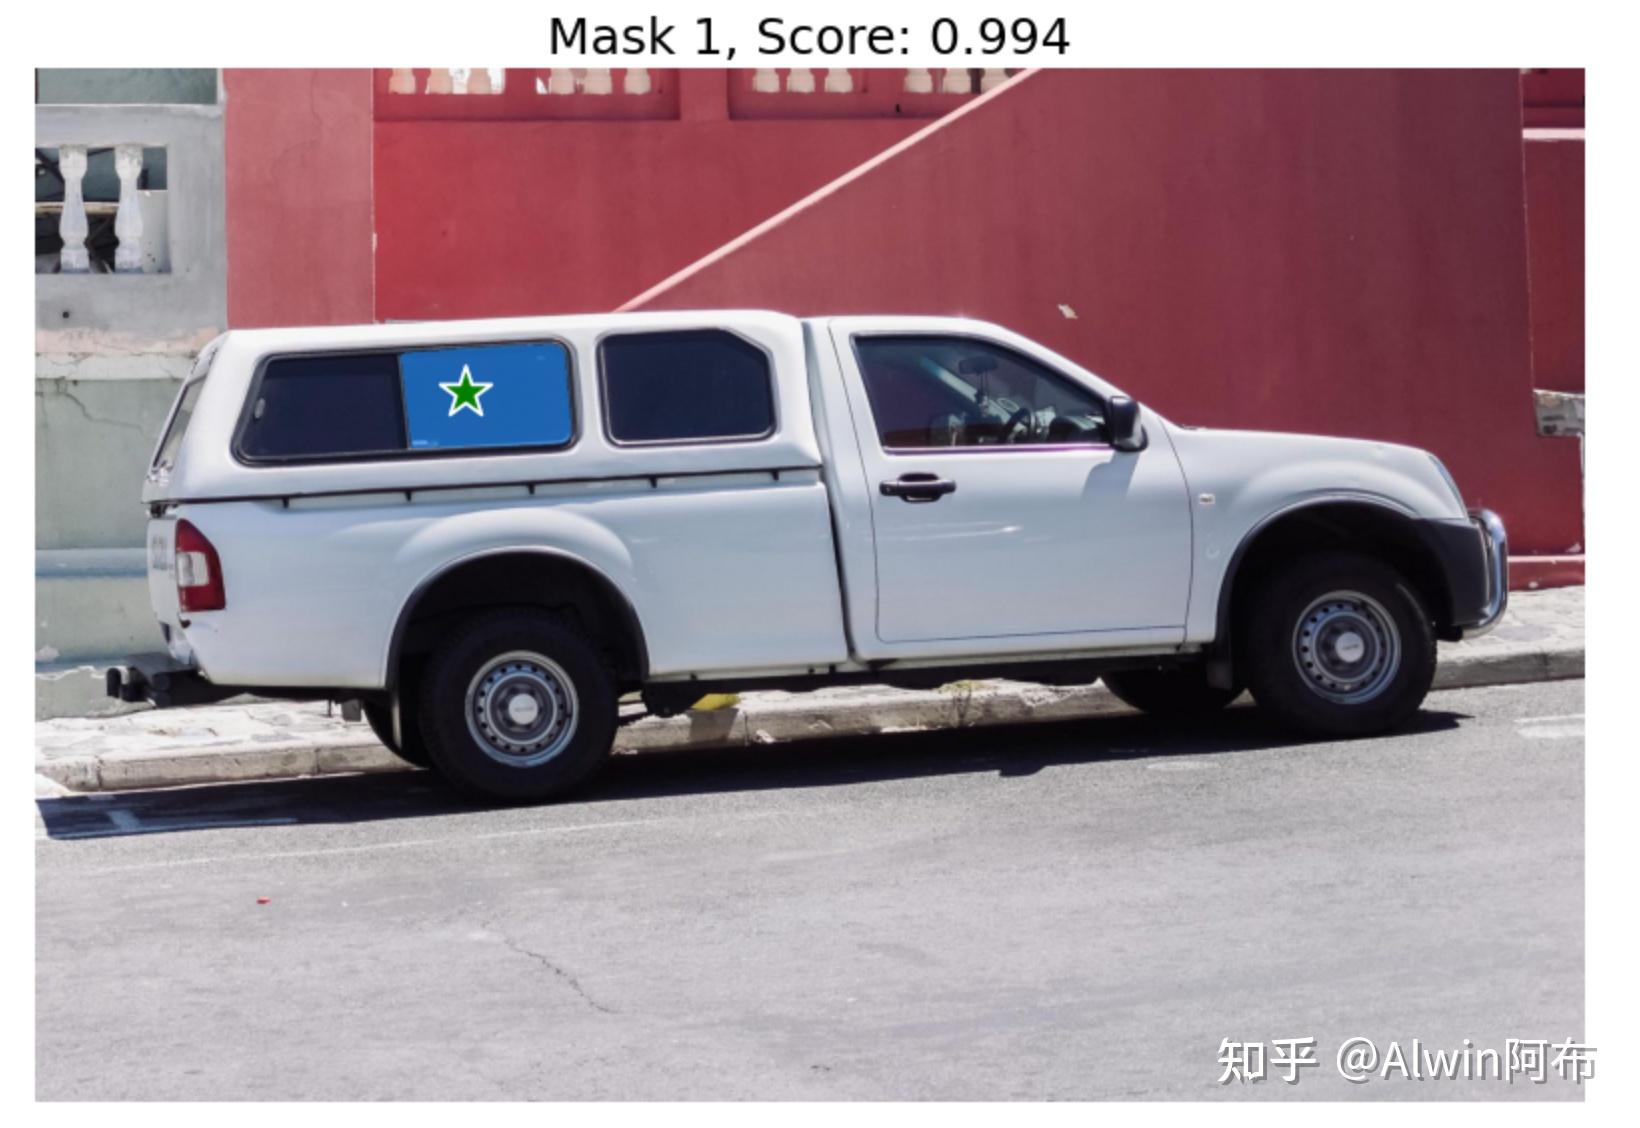 图5 切分1-车窗玻璃 图5 切分1-车窗玻璃 图6 切分2-车窗玻璃2 图6 切分2-车窗玻璃2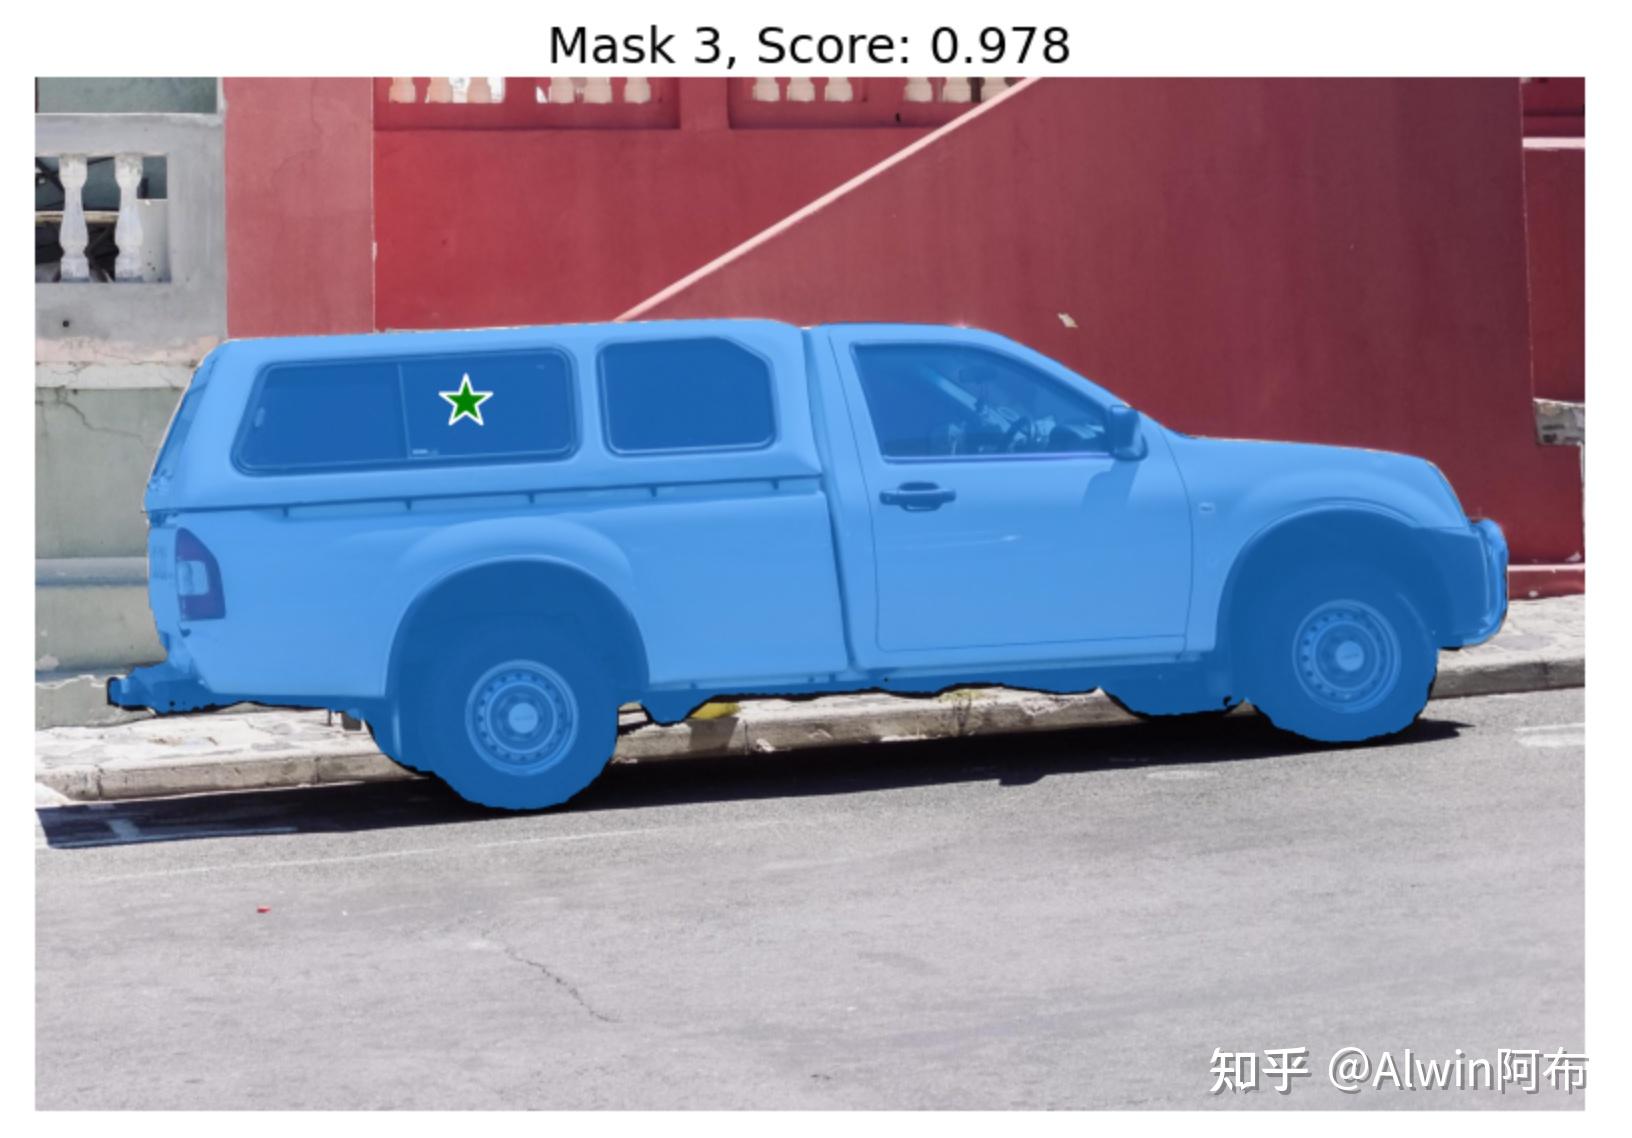 图7 切分3-整车2.3.3 给多个点作为prompt 图7 切分3-整车2.3.3 给多个点作为prompt给一个点的时候可能会有歧义,当想要获取单个物体识,可以提供多个点的提示。 input_point = np.array([[500, 375], [1125, 625]]) input_label = np.array([1, 1]) mask_input = logits[np.argmax(scores), :, :] # Choose the model's best mask masks, _, _ = predictor.predict( point_coords=input_point, point_labels=input_label, mask_input=mask_input[None, :, :], multimask_output=False, ) plt.figure(figsize=(10,10)) plt.imshow(image) show_mask(masks, plt.gca()) show_points(input_point, input_label, plt.gca()) plt.axis('off') plt.show()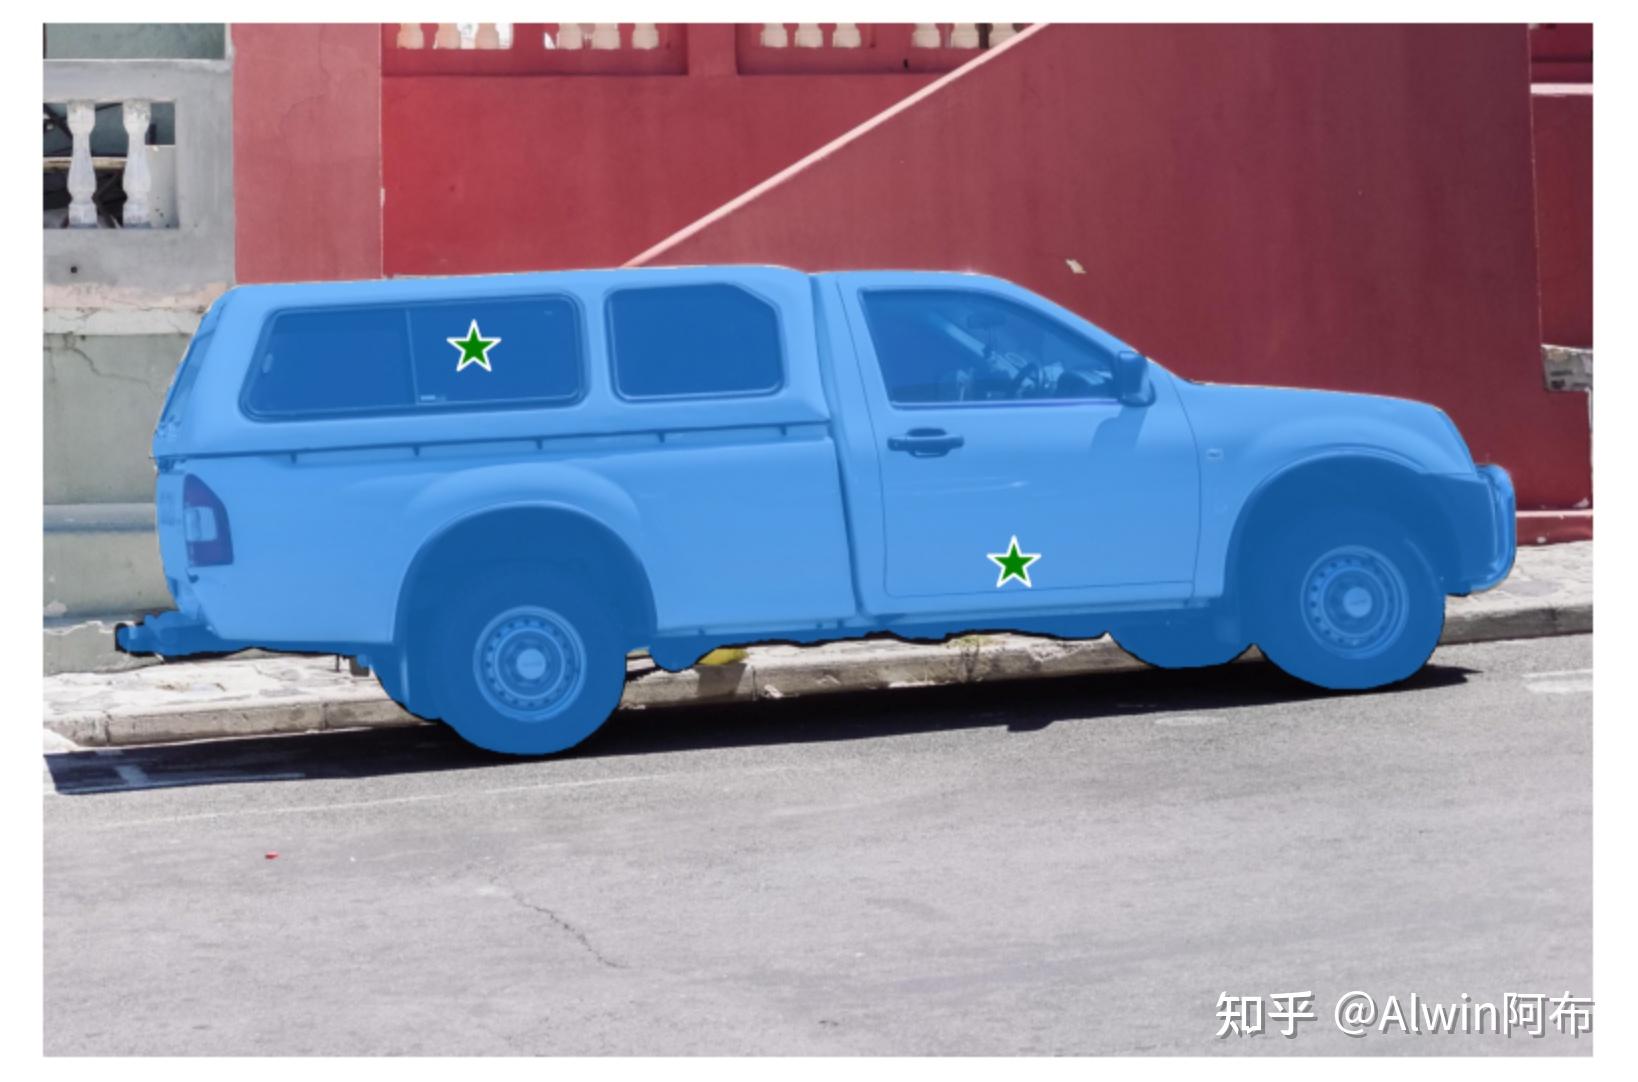 图8 多个点确认整车 图8 多个点确认整车当只想要车窗玻璃,不想要整个车时,可以将第二个点设置为背景点(background point with label 0) input_point = np.array([[500, 375], [1125, 625]]) input_label = np.array([1, 0]) # 将第二个点设置为背景点 mask_input = logits[np.argmax(scores), :, :] # Choose the model's best mask masks, _, _ = predictor.predict( point_coords=input_point, point_labels=input_label, mask_input=mask_input[None, :, :], multimask_output=False, ) 图9 多个点,前景点和背景点2.3.4 指定box作为promptinput_box = np.array([425, 600, 700, 875])
masks, _, _ = predictor.predict(
point_coords=None,
point_labels=None,
box=input_box[None, :],
multimask_output=False,
) 图9 多个点,前景点和背景点2.3.4 指定box作为promptinput_box = np.array([425, 600, 700, 875])
masks, _, _ = predictor.predict(
point_coords=None,
point_labels=None,
box=input_box[None, :],
multimask_output=False,
) 图10 box确定轮胎2.3.5 点(points)和区域(boxes)组合prompt 图10 box确定轮胎2.3.5 点(points)和区域(boxes)组合prompt获取轮胎的区域,但是不要轮毂 input_box = np.array([425, 600, 700, 875]) input_point = np.array([[575, 750]]) input_label = np.array([0]) masks, _, _ = predictor.predict( point_coords=input_point, point_labels=input_label, box=input_box, multimask_output=False, ) 图11 点和区域、前景和背景取轮胎,不要轮毂2.3.6 批量提示 图11 点和区域、前景和背景取轮胎,不要轮毂2.3.6 批量提示给多个提示box,切割出图中多个区域的物体 input_boxes = torch.tensor([ [75, 275, 1725, 850], [425, 600, 700, 875], [1375, 550, 1650, 800], [1240, 675, 1400, 750], ], device=predictor.device) transformed_boxes = predictor.transform.apply_boxes_torch(input_boxes, image.shape[:2]) masks, _, _ = predictor.predict_torch( point_coords=None, point_labels=None, boxes=transformed_boxes, multimask_output=False, )
|
【本文地址】
今日新闻 |
推荐新闻 |